


Photo Size
Start with the largest digital images possible. We recommend using images from a camera rated at 12 megapixels or larger. Some consumer cameras are capable of shooting photos over 20 megapixels, which is ideal for large wallpaper prints.
A pixel is single rectangular tile of color. Pixels are layed out in rows to form images. A megapixel is one million pixels — therefore, a 12 megapixel camera will use about 12 million little colored tiles to create a photo. As you can see in this comparison of three photos where we cropped in on an eye (right), the more pixels a camera uses to build an image, the more detail it can capture, and the larger it can be displayed without appearing "pixelated" or "blocky." This is an important consideration if you're blowing up a photo to the size of a wall.
Cellphones, tablets, and digital cameras should be set to "Large" or "Extra Large" size when shooting photos for wallpaper. And the compression should be set to the best quality. Newer devices are capable of creating large, sharp images, but avoid using older digital devices if their photos don't offer high resolution or if they're overly compressed. Read more about compression in “Photo Quality” below.


If your digital image is too small to begin with, enlarging it won’t help. You can see what happened when this tiny thumbnail-sized daffodil image was enlarged to 3-times its original size (right). It gained a soft blur, sort of a melted ice cream effect.
We use clever software to boost your image up to wall-size. The software employs fancy algorithms and other razz-uh-ma-tazz to improve sharpness and detail that might otherwise be lost during the enlargement process. But it only works properly with images that start out big and haven’t been previously enlarged. Interestingly, a good quality 18 megapixel photo can be increased to 20 times its actual size and still look quite good, while a tiny thumbnail image like the one shown here doesn't hold up well at even 3 times its actual size.
Photo Quality
When shooting photos, use these simple but effective techniques:
- Adjust your camera’s photo settings to the largest size with the finest detail, to produce photos with the highest number megapixels and the least compression. These photo quality settings can be found in your camera’s menu.
- Use a tripod or monopod, or brace your camera against a solid object when shooting photos. Even the tiniest bit of motion can blur a photo, especially one that will be blown up to the size of a wall. And in low light situations your camera requires more time to capture enough light to create the image, so it’s important to make sure it is steady. To compensate for low light one of the automatic adjustments that your camera employs is to slow down the shutter speed, risking blur if the camera moves.
- To avoid being surprised by a slanted horizon, tilted buildings, or leaning people, double-check to make sure your camera is level when shooting your photo.
- Take time to focus. Although you can quickly snap a photo with one press of the camera shutter button, you’ll achieve better results by pressing the button half-way down, giving your camera a little more time to pre-focus. When your camera beeps to indicate that it has found the point(s) of focus, then finish snapping the picture.
- Take lots and lots of photos, and select only the best for printing. Unlike the old film days, any digital images created with your digital camera are free; they cost nothing until you decide to print them.
- Don’t use your camera’s “Digital Zoom” feature — it’s really a fake zoom technique that tends to produce less sharp images. Use “Optical Zoom” instead. You can usually find a setting to disable Digital Zoom in your camera’s on screen menu.
Review your photos on a desktop monitor or larger screen. The image that you see on your camera or device screen isn’t always detailed enough to reveal flaws such as poor focus or motion blur resulting from camera shake. It’s best to compare photos on your computer monitor or TV. Zoom in close to see just how sharp the detail is in your main subjects.
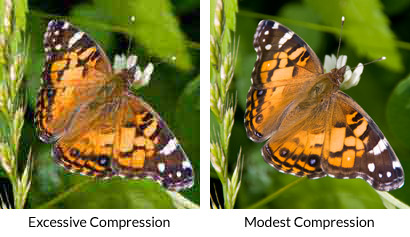
Beware of excessive compression. No matter how many pixels your photos have, they won’t look good if the compression is excessive. This setting is often found in the menu, typically appearing as a "Quality" setting with options such as "Best" or "Highest" quality, or "No Compression." Compare the butterfly images (right) — you can easily see which one is overly compressed.
Photo Shape or “Aspect Ratio”
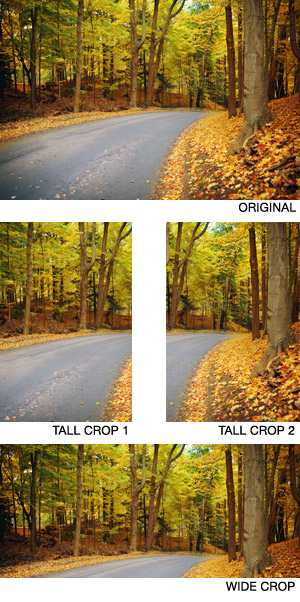
It’s important to compare the shape of your photo and the shape of your wall. If your photo is tall and your wall is wide, you’ll need to decide which parts of the photo to crop out.
Cropping, however, can make a dramatic difference in the character of a photo. You can see this in the various crops of this scenic autumn roadway (right). Professional photographers spend a great deal of time thinking about the framing of a subject when first shooting and then cropping their images. Before submitting an image that requires significant cropping, take the time to visualize how the picture will look on your wall.
Copyright
Don't use images that you don't own or have permission to use. While it's easier than ever to acquire images on the Web, you cannot legally use another person's images without permission (nor can anyone else use your images). The moment a photo is created, the copyright to that photo belongs to the author or company that created it. An image does not require a "Copyright ©" notice to be protected; it is protected with or without that designation. This is especially important for businesses that wish to create large wallpaper displays — misuse of copyrighted material can result in large fines if discovered.
Examples of images you CANNOT use:
- An image or digital artwork that you took from a website without permission
- A photo given to you by another person (you don't automatically have a right to "publish" or print that photo, even if they allow you to keep a physical or digital copy) if they have not given you explicit permission to do so
- A photo you took of another person who has not given you explicit permission to display their likeness
- A newspaper, a magazine cover, an article, or other printed media without permission
- A sports logo or team trademark without explicit permission to do so
Examples of images you CAN use:
- An image or artwork that you created
- An image or artwork that somebody else created and gave you explicit permission to use
- An image from a website that provides certain free to use "Creative Commons" licensing (typically free use of photos created by generous people who don't mind sharing — check the licensing details before using)
- An image that you purchased the use of from a stock photography website
- An image ordered through us for the purpose of creating wallpaper for you
You can learn more about copyright rules at the United States Copyright Office website.